
A developer-friendly guide to the AWS RDS feature that will save you one day
TL;DR: AWS RDS Point-in-Time Recovery lets you restore your database to any second in the past by replaying the Write-Ahead Log on top of daily snapshots. The default backup retention is 1 day – change it to at least 7 immediately. There’s a 5-minute gap in what’s restorable. This guide covers how PITR works, how to use it under pressure, and the three recovery strategies depending on how bad the damage is.
You are having a perfectly normal Tuesday. Coffee is hot, stand-up went fast, PRs are merging. Life is good.
And then your Slack notification buzzes.
🚨 [CRITICAL] Production error rate: 847% above baseline
Somebody on the team ran a query on the production database without a WHERE clause on a table with 80,000 rows.
The Slack thread hits forty messages in three minutes. Your monitoring dashboard looks like a Christmas tree. Half the engineering team is furiously typing. The other half is very, very quiet.
And somewhere in the back of your head, a single question starts getting uncomfortably loud:
Do we have backups?
If you have set up Point-in-Time Recovery properly, the answer is yes – and better than you think. You will be the person saying “relax, I’ve got this” while everyone else is still figuring out the severity.
If you have not, well. Clear your evening.
This is the complete guide to AWS RDS PITR: what it is, how it works under the hood, the sneaky 5-minute gotcha that catches everyone the first time, and exactly how to use it when the chips are down.
What Is AWS RDS Point-in-Time Recovery?
AWS RDS Point-in-Time Recovery (PITR) is the ability to restore your RDS database to any specific moment in the past, down to the second – not just the previous night’s snapshot, but the exact moment one second before a destructive query hit your orders table.
Think of it like a DVR for your database. Traditional backups are like photographing your apartment once a day: if something breaks at 11:58 PM, you have the midnight photo and that’s it. Everything in between is gone. PITR is a continuous video recording. Every moment is there. You pick the frame you want.
PITR is a native AWS RDS feature. It is not a third-party tool, not something you build yourself, and not something you pay extra for beyond storage costs. It ships with RDS. You just have to set it up correctly – which, as we’ll get to, most teams do not.
How AWS RDS PITR Works: The Write-Ahead Log Explained
To understand why PITR is so precise, you need to know what is happening under the hood.
Every change your database makes is first written to the Write-Ahead Log (WAL). Before PostgreSQL updates an actual data file, it writes a record: “transaction 1042 inserted row X into table orders at 14:38:47.” The WAL is a sequential, append-only journal of literally everything that has ever happened to your data.
On RDS, AWS uses this in three steps:
- Full daily snapshot. RDS takes an automated snapshot of your entire database once per day during a backup window you configure.
- Continuous WAL capture. Transaction logs are shipped to AWS S3 in the background, capturing every change between those daily snapshots.
- WAL replay on restore. When you request a PITR restore, AWS grabs the nearest full snapshot as a base and replays the WAL forward until it reaches the exact second you specified.
So if your last snapshot was at 3:00 AM and something went wrong at 2:47 PM, PITR doesn’t make you choose between last night and right now. It replays eleven hours and forty-seven minutes of logged operations on top of the 3 AM base. Your data lands exactly where you asked.
3:00 AM 11:00 AM 2:47 PM NOW
| | | |
[Snapshot] —[WAL replayed]—[Oops!]———-[You]
^
Restore HERE: 2:46:59 PM
Saved: everything before the disaster
Missing: ~1 min of work to reconcile
The gap between the bad event and your last backup collapses from potentially hours down to a minute or two.
Where to Find the RDS Point-in-Time Restore in the AWS Console
PITR is not buried in an obscure settings panel. It’s sitting right in the RDS console, one click away.
Go to RDS, select your database, and click Actions at the top right. You’ll see “Restore to point in time” near the bottom – that’s the button that will save your evening someday.
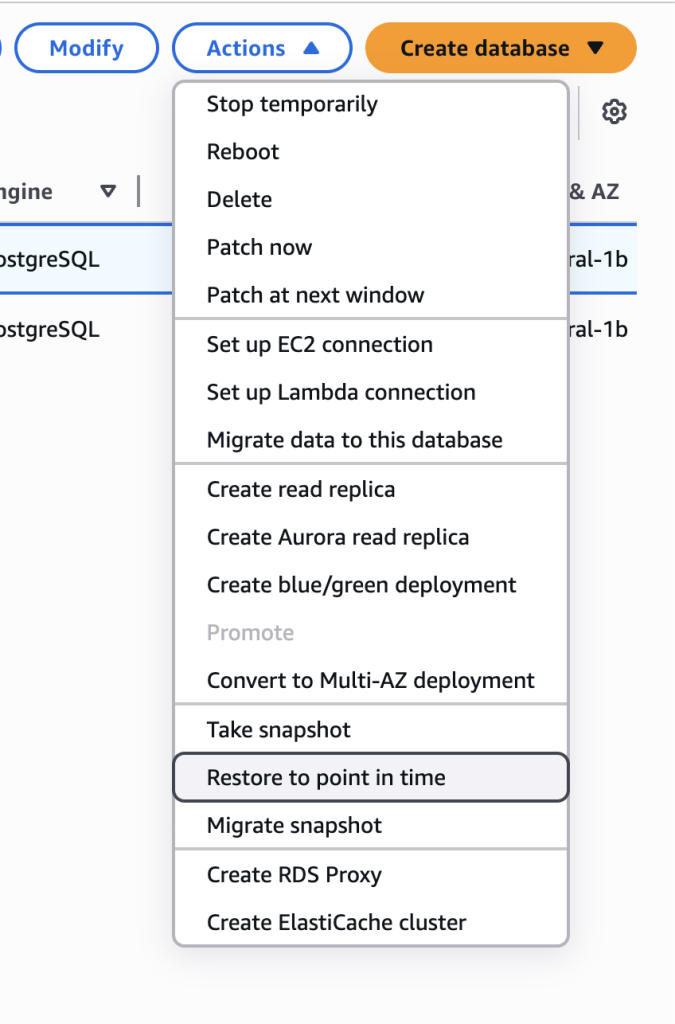
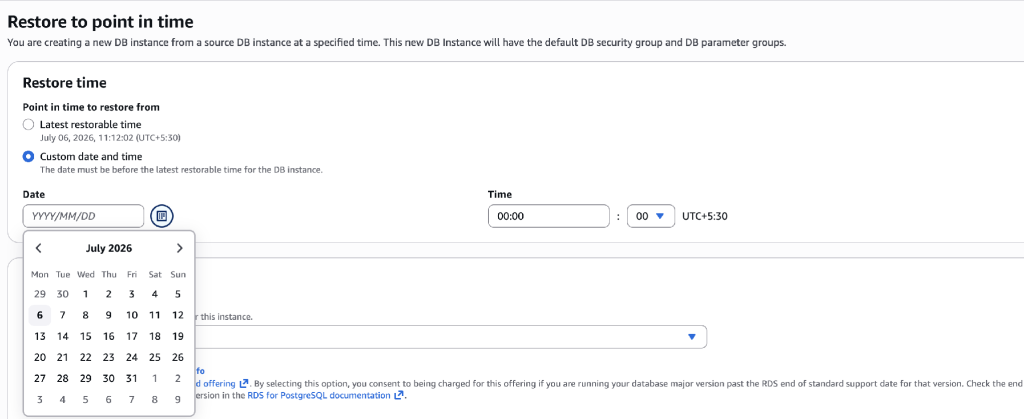
Click it and you land on the restore screen, where you choose between restoring to the latest available point or entering a specific custom timestamp. The Latest Restorable Time is displayed immediately – which brings us to the next section.
The 5-Minute Gap in AWS RDS PITR: What It Means and When It Matters
Here is the gotcha. The thing that makes engineers stare at the screen in confusion during an already stressful incident.
RDS uploads transaction logs to S3 every 5 minutes, not continuously.
This means the latest restorable time is always approximately 5 minutes behind the current moment. AWS shows you exactly what time you can restore to on the restore screen – there is no guessing. But if the bad event happened literally minutes before you opened the console, the last five minutes of WAL data are still sitting on the RDS server waiting for their next upload cycle. They have not hit S3 yet and you cannot reach them.
For Aurora, the gap is typically even smaller. For standard RDS PostgreSQL, that five-minute window is real, official, and clearly displayed. The practical rule: always glance at the Latest Restorable Time before you pick your restore timestamp.
# Check it via CLI if you prefer
aws rds describe-db-instances \
  --db-instance-identifier your-db-name \
  --query 'DBInstances[0].LatestRestorableTime'
In most incidents this doesn’t matter – you’re restoring to an hour ago, not five minutes ago. But know the gap exists.
How to Set Up AWS RDS PITR Correctly (Before the Fire)
PITR activates automatically when automated backups are enabled. But there are a few settings most teams leave at defaults and later regret.
1. Backup Retention Period: Change the Worst Default AWS Chose
By default, RDS keeps automated backups for 1 day. One. Single. Day.
Think about what that means in practice. If a problem occurs and nobody notices for 36 hours – silent data corruption, a bad migration that only surfaces during month-end reporting, a long weekend – you are already outside your recovery window. PITR cannot help you. The logs are gone.
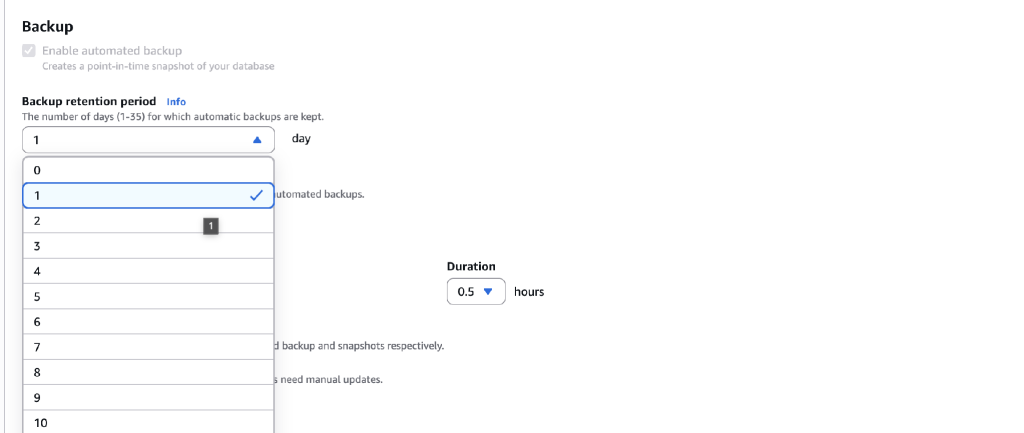
For most production databases, set a minimum of 7 days. For anything that touches real customer data or has compliance requirements, go to 30 or even 35, which is the maximum AWS allows.
aws rds modify-db-instance \

  --db-instance-identifier your-db-name \

  --backup-retention-period 7 \

  --apply-immediately
The storage cost difference between 1-day and 7-day retention is typically a few dollars a month. This is not a budget decision. It is a “how much is your production data worth” decision.
2. Backup Window
Pick a window that doesn’t overlap with your peak traffic. The daily snapshot creates a brief I/O impact on some instance types. Somewhere between 1:00 AM and 4:00 AM in your primary timezone is safe for most teams.
3. Run a Test Restore (Seriously, Do This)
This is the one teams always skip and always regret.
PITR sits in the background feeling reassuring. Engineers set it up, feel good about it, and never actually try it until a real incident. Then at 3 PM on a Wednesday with half the company watching Slack, they discover something unexpected about the procedure they didn’t know.
Run a test restore to a throwaway instance once a quarter. It takes 20 minutes and will teach you more about your actual recovery capabilities than any documentation reading.
How to Do an AWS RDS Point-in-Time Restore: Step by Step
When the incident happens, the single most important thing is: do not rush. The restore process spins up a brand new RDS instance. It does not touch your existing production database. Starting a restore cannot make things worse.
Step 1: Establish the Exact Timestamp
Before touching the console, pin down exactly when the data was last clean. This is the most important work you’ll do, and it’s worth ten minutes to get it right.
Check:
- CloudWatch, New Relic, or Datadog for the exact moment metrics spiked
- Application error logs for the first errors indicating missing or wrong data
- Alert timestamps in Slack or PagerDuty
- Performance Insights: a sudden jump in FreeStorageSpace is a precise, objective timestamp of when data was removed
Step 2: Start the Restore to a New Instance
Navigate to RDS → Actions → Restore to point in time. Select “Custom date and time,” enter a timestamp approximately one to two minutes before the incident, and give the new instance a clear name like prod-db-pitr-recovery-20260623.
aws rds restore-db-instance-to-point-in-time \
  --source-db-instance-identifier your-production-db \
  --target-db-instance-identifier prod-pitr-recovery-20260623 \
  --restore-time "2026-06-23T11:08:59Z" \
  --db-instance-class db.t3.medium \
  --no-multi-az
The –no-multi-az flag makes the recovery instance cheaper since it’s temporary. Give it an obvious name with the date so nobody accidentally treats it as real production.
Step 3: Wait (15–40 minutes), Then Validate
While the restore is running, keep digging into the root cause. When it finishes, connect to the new instance and verify the data looks correct before doing anything else.
Three Recovery Strategies Depending on How Bad the Damage Is
You have a clean copy of your database. What do you actually do with it? The answer depends on the scope of the damage.
Only a Few Tables Were Affected: The Surgical Approach
This is the best case. Instead of swapping your entire production database (which means downtime and losing all legitimate writes that happened around the same time), extract just the damaged tables from the recovered instance and import them back into live production.
# Export only the affected tables from the PITR instance
pg_dump \
  -h pitr-recovery-instance.rds.amazonaws.com \
  -U your_user \
  -d your_database \
  -t orders \
  -t order_items \
  --data-only \
  -f recovered_tables.sql

# Import into live production inside a transaction
psql \
  -h production-instance.rds.amazonaws.com \
  -U your_user \
  -d your_database \
  -c "BEGIN; TRUNCATE TABLE orders, order_items;"

psql \
  -h production-instance.rds.amazonaws.com \
  -U your_user \
  -d your_database \
  -f recovered_tables.sql

# Verify counts look right, then COMMIT - or ROLLBACK if something looks off
This approach keeps production running throughout. Only the damaged tables get restored. Everything else stays untouched.
Widespread Damage Across Many Tables: The Full DNS Swap
If the damage is broad and you can’t confidently enumerate which tables are clean, swapping the entire database is safer than surgically patching a system you don’t fully trust.
The least disruptive way is a DNS CNAME swap. Most teams point their application at a CNAME record rather than directly at the RDS endpoint. Update the CNAME to point at your recovered instance and your application is now talking to clean data without a code deployment.
After the swap, use your application logs and event streams to identify legitimate writes that happened between your restore point and the swap, and replay them manually.
A Bad Migration Changed the Schema: The Reference Approach
If a migration altered or dropped columns rather than just deleting rows, you can’t simply import data back – the schemas don’t match.
In this case, the PITR instance becomes a reference environment, not your data source. Use it to understand what the schema looked like before the migration, write corrective SQL to undo the structural changes, apply it to production, and then bring the data across once the structure matches again.
The Mistakes That Will Ruin Your Recovery
- Retention period still at 1 day. The most common and most costly mistake. Change it before you close this tab.
- Never having tested a restore. The first time you use PITR under real pressure is the worst possible time to discover something unexpected.
- Not checking the Latest Restorable Time first. The console shows you this clearly. The 5-minute gap matters for very recent incidents.
- Skipping the reconciliation step. Restoring to before the incident does not magically recover legitimate work that happened in the same window.
- Promoting a restored instance to production without validating it first. Take ten minutes. Never do this blind.
Frequently Asked Questions About AWS RDS PITR
What is AWS RDS Point-in-Time Recovery (PITR)? AWS RDS Point-in-Time Recovery is a native RDS feature that lets you restore your database to any specific second in the past, within your configured retention window. It works by combining automated daily snapshots with continuous Write-Ahead Log (WAL) capture to S3. When you trigger a restore, AWS replays the WAL from the nearest snapshot forward to the exact timestamp you specify.
How far back can I restore with AWS RDS PITR? You can restore to any point within your backup retention period – between 1 and 35 days. The default is 1 day, which should be changed to at least 7 for any production database. The maximum is 35 days.
What is the 5-minute gap in AWS RDS PITR? RDS uploads transaction logs (WAL) to S3 every 5 minutes, not continuously. This means the Latest Restorable Time shown in the console is always approximately 5 minutes behind the current moment. If a destructive event happened less than 5 minutes ago, those most recent WAL entries may not yet be in S3. For Aurora, this gap is typically smaller. For standard RDS PostgreSQL, the 5-minute gap is real and visible directly on the restore screen.
Does a PITR restore affect the existing production database? No. PITR always creates a brand new RDS instance. It never modifies, overwrites, or touches your existing production database. You can start a restore immediately and it cannot make things worse.
How long does an AWS RDS point-in-time restore take? Typically 15 to 40 minutes, depending on the size of the database and how far the WAL needs to be replayed. Larger databases with longer gaps between the snapshot and the restore point take longer.
What should my RDS backup retention period be? At minimum 7 days for any production database. For databases with customer data or compliance requirements (GDPR, SOC 2, HIPAA, etc.), set it to 30 or 35 days. The default of 1 day is insufficient for almost any real production use case.
Does AWS PITR cost extra? PITR itself does not cost extra beyond the storage costs for the automated snapshots and transaction log backups stored in S3. Increasing the retention period from 1 to 7 days typically adds a few dollars per month per database.
Quick Reference
Bookmark this. You will want it at 3 PM when your hands are slightly shaky.
# 1. Check your current retention period (should be 7+)
aws rds describe-db-instances \
  --db-instance-identifier YOUR_DB \
  --query 'DBInstances[0].BackupRetentionPeriod'

# 2. Set retention to 7 days
aws rds modify-db-instance \
  --db-instance-identifier YOUR_DB \
  --backup-retention-period 7 \
  --apply-immediately

# 3. Check the latest restorable time
aws rds describe-db-instances \
  --db-instance-identifier YOUR_DB \
  --query 'DBInstances[0].LatestRestorableTime'

# 4. Start a restore to a specific timestamp
aws rds restore-db-instance-to-point-in-time \
  --source-db-instance-identifier YOUR_DB \
  --target-db-instance-identifier YOUR_DB-pitr-recovery \
  --restore-time "2026-06-23T11:08:59Z" \
  --no-multi-az

# 5. Or restore to the latest available safe point
aws rds restore-db-instance-to-point-in-time \
  --source-db-instance-identifier YOUR_DB \
  --target-db-instance-identifier YOUR_DB-pitr-recovery \
  --use-latest-restorable-time \
  --no-multi-az

# 6. Export specific affected tables from the recovery instance
pg_dump \
  -h PITR_INSTANCE_ENDPOINT \
  -U your_user \
  -d your_database \
  -t affected_table_name \
  --data-only \
  -f recovered_tables.sql

# 7. Import recovered data into production
psql \
  -h PRODUCTION_ENDPOINT \
  -U your_user \
  -d your_database \
  -f recovered_tables.sql
The Real Lesson
PITR costs almost nothing to set up correctly. A higher retention period adds a few dollars a month. A test restore takes twenty minutes. Writing down the procedure takes another ten.
Not having it when you need it costs you data, trust, and the kind of evening you don’t forget.
The engineers who feel calm during a database incident are not always the most experienced people in the room. They are the ones who were quietly paranoid on a random Tuesday six months ago – who thought “what if this goes sideways?” and took twenty minutes to do something about it.
PITR is the fire extinguisher on your office wall. You put it there on a normal day so that when the fire happens, you are not standing around wondering where to find one.
Enable automated backups on every production database. Set retention to at least 7 days. Run a test restore. Know the procedure.
And when that Slack notification buzzes on a Tuesday afternoon, you will be the person who already has the restore running while everyone else is still reading the error message.
If this guide saved your evening – or at least your peace of mind – share it with the engineer who last touched your RDS backup settings. They need to read it too.

Leave a Reply